Friday, April 22, 2011

Easter/Spring cupcakes

I made these for Tracey. She wanted 2 dozen spring cupcakes for the adults at her Easter party and 1 dozen Easter cupcakes for the kids. I had a great time making these. The colors made me so happy!!
I used all my big tips to make these like 1M, 2D, petal tip (for the flower) and then some that don't have numbers that my mom gave me from a retired chef she knew, like the big swirl. I tried to not use too many sprinkles since they were for adults but they needed something extra. Oh I used lemon cream cheese for the frosting with vanilla cake.

I haven't gotten tired of making these this year. I love the jelly bean flower and the sugar coated marshmallows. The rainbows (airhead licorice) are fun to do too.
Happy Easter!

Wednesday, April 20, 2011

Easter baskets


Jill and I made these for our Easter playgroup. I got the idea from Bakerella's cake pop book.

I didn't want the work of a cake pop so I used mini cupcakes instead which fit in here perfectly.
The basket is made out of a waffle cone that was measured 1 1/2 inches from the top and cut with a serrated knife. I saved the bottom of the cone to make the ice cream cake pops for a shower this weekend. We then put the cupcakes in the top opening of the basket, covered them with grass (cream cheese frosting) using the grass tip. Then added jelly beans and the bunnies I found in a package of edible grass.
Bakerella used a sour straw for the handle which was super cute and would have been easier but I couldn't find them so I used chocolate. I mixed a little milk chocolate with white and yellow to try and match the basket. I melted it in a bowl first then poured in a ziplock cut the corner and piped them onto wax paper. Under neath the wax paper I traced an arc that was the correct size for the basket. I tried to make the handle seem like wicker, some turned out better than others.


So you can see here how the basket is starting to come undone. It is because of the moisture of the cupcake and the humidity. We had a lot of these ruin so I would suggest not to make them the night before.

I was glad we did some without the baskets.

Jill had a fun spread for us all to enjoy. We had a great time eating and having an Easter egg hunt. Thanks Jill!!

Saturday, April 16, 2011

Shark Birthday Party

As I mentioned before Ethan has been into sharks lately. He loves doing research, drawing pictures, and talking about them. So he was very excited to have a shark birthday.
I have included lots of pictures of the decorations, etc so I can do this again or so you won't have to do all the research. I had a fun time putting this party together. There wasn't a lot of shark themed stuff out there so I got to be creative with it.

This was the cake. I can't take full credit because my husband helped me a lot. He is so amazing! We tried to copy an image we saw on Coolest Birthday cakes. The shape started out with two loaf pans stacked on top of each other with the one hanging over as much as it could without falling over. We then carved it into the shape of the shark. We used a piece of the trimmings to form his bottom jaw. The fin is a piece of cardboard cut and frosted. His teeth were made from fondant. The rest of him was just tinted frosting. We should have done a crumb coat but by 1 am we were done with this thing and I couldn't be my normal perfectionist self when I had the awesome help of my honey.

This table was too big for our cake so last minute we added some other sea life. I made a corral reef/sea weed thing by cutting and putting fruit slices on a skewer which was placed in a cupcake. The sand was turbinado sugar. We also tried doing schools of fish but they didn't turn out so well. I really wanted to experiment with the candy corral reefs that Cake Boss made but I ran out of time.


It was so fun to see the look on the boys faces when we cut into the cake. They said it looked like blood and guts. That's why I chose to use red velvet cake and it made me happy for them to see my vision.

My amazingly talented friend Alisha designed this invitation for me. I fell in love with this little guy. We had a great time putting these together. I love how his mouth opened up and that's where we wrote the info.

Alisha made this for me with her awesome Cricut.

Jared added the fin to the mailbox. I loved it!

We hung sea weed from the ceiling and blew up blue balloons to look like bubbles.

To add to the under the sea feel we hung a fishing net from the ceiling and attached a birthday banner using opened paper clips to look like hooks from the fishes mouths. Thanks Alisha for all your help on this.

Alisha also made this for us. I think I need to hire her as my party planner. This was pin the diver in the sharks mouth game. We also played traditional birthday party games with a shark twist to them like:
1.Musical chairs-they all found seats on the boat and when the music played they danced or played around on the boat until the music stopped. The person who didn't have a seat on the boat got eaten by a shark(me)
2. Tag-the person "it" was the shark and everyone else were fish. If the shark tagged the fish he had to go to the "frying pan" where he stood with his legs open like he was dead. He could return to the game if another fish was able to get away from the shark and crawl through his legs. (this was one of their favorites)
3.What time is it Mr. Shark -the shark stood with their backs to the fish. The fish asked what time is it Mr. Shark and the shark would say a time like 5 0'clock then the fish would take 5 steps closer to the shark. If the shark said it's lunch time then he would turn around and try and catch a fish. They would be the next shark.
4.Stomp the balloons-we blew up gray balloons and drew sharks on them. The kids had to get the sharks before the sharks got them. It was fun watching them try and pop some of the hard ones. We added a paper fin to one of the balloons before we blew it up and whoever got it won a prize (bragging rights.)

We feed them pizza (shark fins) and this scary watermelon.

Since there wasn't any shark plates I wanted to add a shark fin to these. Jared had the brilliant idea to cut the fin out of one plate making sure the folded edge was in the center of the plate and then cutting a slit through another plate and sliding the fin of one plate through the slit of the other plate. I hope that's not too confusing.
For the drinks we did a blue drink with shark fruit snacks frozen in ice cube trays. Note: let the water get cold for a while before adding the sharks otherwise the sharks will dissolve.

These were the take home bags. This was the low budget version. You could also do some little silver pails with "fish food." I just used the white lunch bags and glued waves and a fin on the bottom.

These are the tags that Alisha helped me do. I thought this would be a fun way to put the kids names on the bag. Alisha had the brilliant idea to laminate them so the boys could put them on their backpacks. They loved them. My favorite thing is the shark bite.

This is what we put in the bags. I found the gummy sharks and the toys at the Dollar Tree. The fruit snacks and crackers at the grocery store.
*I had a blast doing this. I couldn't have done pulled it off without the help of Alisha and my husband. Thanks for putting up with my craziness! You're the best! I will always remember this.

Friday, April 15, 2011

Shark Attack


I made these for Ethan's class to celebrate his 7th birthday. He has been into sharks lately. So when I found these from Hello Cupcake I knew it was the perfect treat to celebrate with.

After hour #7 I was cursing these little guys. They were a pain to frost and I am surprised they actually looked like sharks when I was through. I hate when directions in a book make it sound easy but when you try it you can't even get it to remotely work in the same way. Oh well! I was finally at peace with the sharks when Ethan saw them and couldn't wait for his friends to see too. He said he loved how scary they looked. Yes score, he didn't notice the mistakes. I love doing cupcakes for kids.
In the end I was glad I only made 8 of these things. This is how I did it in a nutshell. I cut 2 inches off a twinkie at an angle, cut a oreo cookie in half and inserted it into the end of the twinkie. I froze them for 20 minutes then frosted them with gray frosting. The easiest way I (well my husband and I since he was helping me too) found to frost them was thin out the frosting a little and use a knife to frost. The directions say to use a pastry brush but that didn't work for me. Before the frosting sets add mini chocolate chips for eyes, and pre-cut red fruit rollups for his mouth. Then pipe on teeth with tip#2 and black gills.

Because there were two other girls who celebrated there birthdays in April I decided to only make sharks for the boys. Good thing since those sharks gave me such trouble.

These were fun to do and simple. I needed that! As you can tell from other posts I have enjoyed doing some of these spring cupcakes over and over. I don't think I will get sick of it either.

This one in particular is one of my favorites. The rainbow part is very flimsy so it can be tough to not sag but the idea is cute.

I made this one for his teacher. I thought she might like a cupcake without all the candy on it.

Tuesday, April 12, 2011

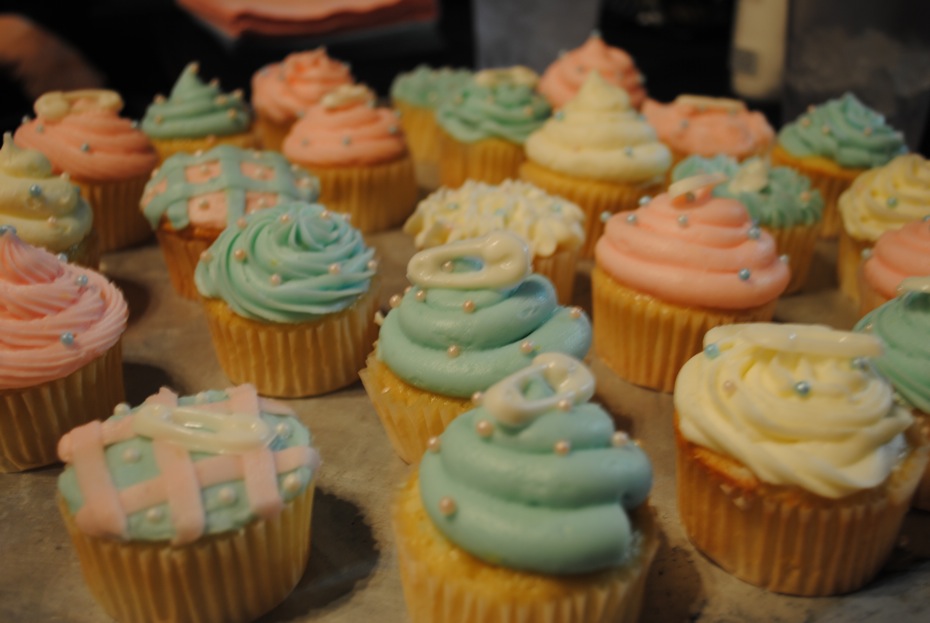
Baby shower cupcakes


I made these for Jenny. She did a combined baby shower and needed pink and blue cupcakes. I love these colors together.

I topped some with a baby diaper pin made from white chocolate. I love how simple and elegant they turned out. Simple is almost always better.

Jenny was so sweet and sent me these pics from the shower. I love the tray she displayed them on.

Handy Manny cupcakes


I made these for a neighbor friend. She got the cupcake toppers online which made these so cute.


Happy Birthday Elliott!

Monday, April 4, 2011

White chocolate popcorn


I made this for a girls night out. I got this easy recipe from my friend Cassie in Las Vegas.

I used microwave kettle corn, then melted 4 different colors of chocolate and drizzled over the top. I thought it would be fun to add the spring colored M&M's too.

This makes a cute little gift. I have used them for thank you's or take homes for a shower. The fun thing about this is you can choose any color to match your theme or party.