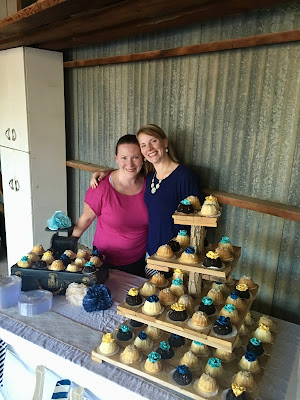
I was asked to make a small wedding cake and 300 cupcakes for Alyssa's wedding. I can honestly say this was one of the hardest and most exhausting days/weeks of my life. If it wasn't for these two amazing people, Michelle M and her husband Shane, I wouldn't have been able to do it. We also got through this with lots of Diet Dr. Pepper and laughs. Seriously Michelle you saved me!
I can't leave these 3 out. Michele T and her husband Corey came a few hours before the wedding to help Jared assemble these bundt cakes and put them in pans to be ready to transport. They were super helpful!
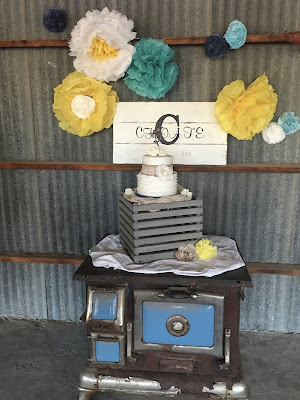
Their wedding was held in a barn and I loved her theme, burlap and lace. Her colors were also beautiful, yellow, teal, navy blue and gray.
Here is the beautiful wedding cake. I can say that because it was mostly Michelle M's creation. She helped me so much with this. Or I should say I helped her with this!
We baked a vanilla cake, layered it with raspberry filling, and topped it with cream cheese frosting and fondant. This is where Michelle M worked her magic.
She is so good at covering cakes with fondant. I was thankful for her knowledge but I don't think I will ever do another wedding cake again. She made these beautiful flowers with gumpaste For the ruffles we rolled out the fondant really thin, cut it into strips, and used a ball modeling tool (used for gumpaste flowers) to thin out the outer edges resembling a ruffle, and then attached them to the cake using a paintbrush and water. We added the ribbon and pearls for the finishing touch.
Thank you so much Michelle for your hard work in this!

Originally I was asked to make cupcakes. As time went on and we watched the weather we had to change that. Cream cheese frosting wouldn't hold up in 110 degree weather against a metal wall. So we decided on mini bundt cakes with ganache toppings instead of frosting.
These were so much more work that we anticipated. 300 bundt cakes is a lot of cake. But Michelle and I had fun figuring out the right cake, filling and ganache combos to use.
The three flavors we chose were: Pina Colada, Double Chocolate, and Vanilla with Raspberry.
I liked this rustic cake tower they used to display the cakes.
This suitcase is fun too!
We spent a lot of time trying to figure out what to put these cakes on to catch any ganache drips and to make serving them easier. We settled on cutting out butcher paper (found at Sam's club) with a scallop punch. Thank you Shane and Jared for doing this for us. It was a lot of work!
Last week we started making the toppers for these little cakes. We thought it would be pretty to make gum paste flowers in her 3 main colors. I have never done this and it was a lot of fun to learn (thanks Michelle.)
We made gum paste using this recipe:
CMC Powder (Tylose) Gumpaste
The following recipe will make approximately 2 pounds of gumpaste:
4 - Large Egg Whites
1 - 2 lb. bag 10x powdered sugar
12 - Level teaspoons CMC Powder (Available in our online store)
4 - Teaspoons shortening (Crisco)
1. Place the egg whites in a Kitchen Aid mixer bowl fitted with the flat paddle.
2. Turn the mixer on high speed for 10 seconds to break up the egg whites.
3. Reserve 1 cup of the powdered sugar and set aside.
4. Turn the mixer to the lowest speed and slowly add the remaining sugar. This will make a soft consistency royal icing.
5. Turn up the speed to setting 3 or 4 for about 2 minutes. During this time measure off the tylose into a small container.
6. Make sure the mixture is at the soft peak stage. It should look shiny, like meringue and the peaks fall over. (If coloring the entire batch, add the paste color at this stage, making it a shade darker than the desired color.)
7. Turn the mixer to the slow setting and sprinkle the Tylose in over a five second time period. Next, turn the speed up to the high setting for a few seconds. (This will thicken the mixture.
8. Scrape the mixture out of the bowl onto a work surface that has been sprinkled with some of the reserved 1 cup of
powdered sugar. Place the shortening on your hands and knead the paste, adding enough of the reserved powdered sugar to form a soft but not sticky dough. You can check by pinching with your fingers and they should come away clean. Place the finished paste in a zip-top bag, then place the bagged paste in a second bag and seal well.
9. Place in the refrigerator for 24 hours if possible before using to mature the paste.
10. Before use, remove from refrigerator and allow the paste to come to room temperature. Take a small amount of shortening on the end of your finger and knead this into the paste. If you are coloring the paste, add the paste color at this stage.
11. Always store the paste in the zip-top bags and return to the refrigerator when you are not using the paste. Will keep under refrigeration for approximately 6 months. You can keep the paste longer by freezing. Be sure to use zip-top freezer bags. If you will be freezing a batch of paste, allow it to mature for 24 hours in the refrigerator first before placing into the freezer.
We used gel color to dye the paste teal, yellow and navy blue. We rolled out the paste really thin on my fondant mat (above) and used a small pedal cutter to cut the individual pedals out for each flower. We put the pedals on a small styrofoam square and used a ball modeling tool to thin out the outer edges of each pedal. You start by using a circular motion on the inside of the pedal and gently work your way to the outside. Your tool should be on half of the pedal and half of the foam pad. You want to create a ruffled rose pedal look for each one. *Keep in mind that you don't want these to dry out before thinning out the pedals so keep them covered until you're ready for this step. After you get the pedals how you want them you can start attaching them to a bud like the teal one above. You can make the buds ahead of time so they have time to dry out just make sure they are 2/3 the size of your pedal. To attach them use a paint brush and water. We needed these flowers to be small enough for the bundt cakes so we didn't add a lot of pedals but you can keep adding pedals until you like them (see the wedding cake for a full flower look.) The bigger the size of pedal you use the bigger the flower will be.

We could only bring ourselves to make 150 of these. That's a whole lotta thinning out pedals. We figured not every cake needed a flower.
See how different the teal one here and the yellow one below look? The yellow pedals were thinned out more creating a more ruffled look. It was fun to see how different they all looked.
We used a fun edible glitter spray on these. This is the only photo you can kind of see it in.
Ok now for the recipes for these little things:
Double Chocolate:
Chocolate Cake (this is Michelle recipe and it is delicious)
Mix the dry ingredients in bowl: 3/4 cup cocoa powder (adding a little dark is yummy)
1 1/4 cup flour
1/2 tsp. baking soda
1/4 tsp. salt
Chocolate part: combine and melt in microwave 30 seconds at time, 1 cup chocolate chips (semi-sweet)
12 Tbsp (1 1/2 sticks) unsalted butter
Combine wet ingredients in mixing bowl: 4 eggs, 1 1/2 cup sugar, 1 tsp. vanilla, 1 cup buttermilk
Wet+ chocolate+ Dry.
Bake in greased (we used Bakers Joy) mini bundt cake pan 350 for 12ish minutes.
We topped the chocolate cakes with a chocolate ganache. We melted 2 2/3 cup semi sweet chocolate chips and 1 1/3 cup cream (2:1 ratio) in microwave(50% power) for 1 minute and then stirred it. We repeated it every 30 seconds until melted. Drizzle over the cakes once it has set up a little bit.
Vanilla with Raspberry:
Vanilla cake: We used these extra ingredients (cake extender) to go with a white cake mix
1 cup flour
1 tsp. baking powder
3/4 cup sugar
1/2 cup oil
2/3 c milk
1 cup sour cream
1 egg yolk
This is how we prepared it:
Mix dry ingredients in bowl: 1 cake mix, 1 cup flour, and 1 tsp. baking powder
Mix wet ingredients in mixing bowl:1 tsp vanilla, 1 cup sour cream, 3 eggs, 1 egg yolk, 3/4 cup oil, 3/4 cup sugar, and 1/3 cup lemon ** don't add lemon until very last or else it will curdle.
Bake in greased (we used Bakers Joy) mini bundt cake pan 350 for 12ish minutes
Raspberry filling
16 oz. frozen raspberries thawed
1/3 cup sugar
3 Tbsp. cornstarch
1 Tbsp. lemon juice
Drain raspberries, reserving liquid. Add enough water to liquid to equal 1 1/4 cups. In large saucepan, combine liquid, sugar, cornstarch and lemon juice; mix well. Heat and stir until mixtures boils and thickens. Cool completely. Stir thawed raspberries into cool mixture.
White chocolate ganache:
7 1/2 cups white chocolate chips and 2 1/2 cups cream (3:1 ratio). Microwave 1 minute (50%power) repeat until melted
Pina Colada:
Coconut cake:
Mix dry ingredients in bowl: 1 cake mix, 1 box of coconut pudding, 1 cup flour, and 1 tsp. baking powder
Mix wet ingredients in mixing bowl: 2 1/2 tsp. coconut extract, 1/4 cup sour cream, 3 eggs, 1 egg yolk, 1/2 cup oil, , and 2/3 cup coco loco, 1 cup coconut milk (chaokoh brand)
Bake in greased (we used Bakers Joy) mini bundt cake pan 350 for 12ish minutes
Pina Colada Filling:
1/2 tsp. salt, 3 Tbsp. cornstarch, 1/3 cup sugar, 1 (20 oz) can crushed pineapple with juice, and 3 Tbsp. butter.
In saucepan combine cornstarch, sugar and salt. Add pineapple, and mix well. Cook over medium heat until it comes to a boil. Cook for 5 minutes stirring constantly until thickened. Remove from heat and add butter.
*This was our first time trying this recipe out and after tasting it we didn't like it very much so we added
lime juice (from approx. 1 1/2 limes,) and some coconut flavoring and coco loco.
Pineapple glaze:
·
1-1/2 cups powder sugar
In a small saucepan melt butter, add the pineapple juice and powder sugar, stir until sugar is dissolved.
**Once we poured the glaze over the filled cakes we topped them with toasted coconut. Yum!!
Thank you dear friend for all your help!
Happy Wedding Alyssa!












 Posts
Posts

