I did this last minute for Patti's husband on New Year's Eve. I volunteered to just bake the cake but I just couldn't give it back to him plain so I busted out some quick chocolate letters and confetti designs. Peter said he was happy to finally get an Amy cake. What a sweetie!
Thursday, December 31, 2009
Tuesday, December 29, 2009
Baby shower cake pops
My mom and sister helped me make these cake pops for my sister-in-law's baby shower. We had a great time doing this together. We are so happy that Janae is having a girl after 2 boys. I couldn't get over how fun it was to see the pink with the brown this time. I will never get tired of those colors together.
For the cake flavors we did coconut, chocolate and strawberry. We then covered them with pink, white, or milk chocolate melts. The toppings were sprinkles, crushed oreos, toasted coconut (for the coconut cake), chocolate shavings, crushed M&M's, or just a simple drizzle with the contrasting chocolate colors.
*See the Cake Pop post for step by step directions.
Sunday, December 20, 2009
Snowflake cookies
When I arrived to my mom's for Christmas vacation to relax and just enjoy the season, she had other ideas. She busted out these beautiful snowflake cookies from the freezer and asked if I wanted to help decorate them. Of coarse I couldn't resist. The relaxing can wait, right? My mind started reeling of all the possible snowflake decorations and to this day whenever I see a snowflake I think oh now that would make a cute cookie. My mind is warped, all it likes to think about is sweets. So my mom and cute sister-in-law, Janae are so good to put up with my craziness. They frosted the cookies and let me do the decorating (the best part.) Thanks for the memories girls!
Friday, December 11, 2009
Christmas treats
I did these treats for a Christmas party with some friends. I had a fun time trying to get this tower to look alright. I used my 2 cake platters with a silver vase I had stored, which I filled with candy canes.
The caramel pretzels I did in two steps. A couple nights before I made the caramel. I use my mom's caramel recipe: 1 cup sugar, 3/4 cup karo syrup, 1 cup whipping cream, 1/4 cup of butter, and 1/2 tsp. vanilla.
Add sugar, 1/2 cup of the cream and karo to heavy pan over low heat. Wash sides with hot water and don't let boil until sugar dissolves. Once sugar is dissolved turn heat up to medium. Add other half of cream slowly then add butter. Cook to 242 degrees. Add vanilla. Pour into greased 9x13 pan.
I take the caramel out of pan and place it on a cutting board and cut small strips. I then wrap it around the pretzel (I got this idea from my sister-in-law, Amber.) I then cover it with chocolate right away and set it on wax paper and either cover with sprinkles, crushed peppermint (looks prettier than it tastes,) or let dry and drizzle red and green chocolate over them. These are fun for all holidays or occasions. You could even use a nicer store bought caramel since the taste of the caramel is overpowered by the pretzel and chocolate. I just like working with my mom's caramel and it's fun to cut and wrap any extra caramels in small wax paper squares to give as gifts.
The chocolate covered strawberries are self explanatory. I do like the taste of the Wilton chocolate melts over any other milk chocolate you can buy in the store, unless you want to pay for good chocolate then Peter's is by far the best.
I love the chocolate covered cinnamon bears. They are also very easy especially if you don't dip the heads. Once dipped I place on wax paper to dry and then drizzle the other chocolate colors using my Wilton chocolate drizzle bottles. I found the fun star glass bowl at the Dollar Tree.
Saturday, December 5, 2009
200+ Christmas Cupcakes!
This was a huge undertaking but I enjoyed every minute of it especially the memories that were created working with these 2 cute girls. They must love me for getting them involved in this. I was asked to decorate 220 cupcakes for our church party. I didn't have to bake them just decorate them, sounds easy right? Well I knew I would need help so I asked Danielle and Alisha to be my helpers. We had a few others come in for a few minutes and help as well (even Alisha's husband helped with some.) They must have thought I was crazy. So the night before Danielle came over to my house last minute to help me get things organized. We put ribbon on all the platters and started making the cream cheese frosting. We ended up having to make a Wal-Mart run at midnight to buy more red food coloring. I am so thankful for Danielle. She is one of those amazing friends that would be there for you any night you needed to make a midnight Wal-Mart run. I love this girl. So I didn't get to bed until 2:30 the next morning, but hey all 10 batches of frosting was made. I was at the church at 9:30 am and didn't finish decorating until 5 pm. I am so thankful for the 2 Lisa's in my life. My sister-in-law Lisa for watching my kids all day so I could do this and also for the Lisa in my ward for bringing me food to get me though the day since I forgot to eat breakfast and for getting all my ingredients to do this.
We had 24 tables to display our cupcakes on. We borrowed several peoples cake stands for the center pieces and displayed 8-10 cupcakes on each one.
These were some of my favorite cupcakes. I got the idea online. The H's were done with chocolate letters but before they dried I put sprinkles on them. I liked the texture it gave them. The first HO's frosting was done by painting stripes on a parchment bag with the red and green food coloring and placing white frosting in the bag and then piping the 1M swirl.
I also got this idea online. His snout is a Nilla wafer, nose M&M, antlers is a pretzel. I can't take any credit for these. I showed Danielle how to do them and she did all 24.
We didn't have enough room on some of the platters for 8 cupcakes so we put some on the tables. Is it obvious that I like doing chocolate letters on cupcakes?
wreath- used star tip for leaves, sprinkles for berries, and tip 3 for ribbon at the top
holly berry- M&M's for berries, leaf tip 352 for the leaves
ornaments- peanut butter cup with broken off pretzel coming out of the top for the hook
1M swirls in every color with either sprinkles or crushed up peppermint
lattice
pokadots
star tip- plain or swirl
This was the cutest cake platter (Danell's) it looks like a bell. The picture doesn't do it justice but I had to put it on here because one day I want to own one just like it.
**Thanks to Danielle for taking these pictures. Your camera is amazing and you are much better at taking them than me. Can I hire you and Lisa to take all my pictures?
I wish we would have thought to get a picture of the mess in the kitchen with cupcakes everywhere but we were too busy to think that far ahead.
Saturday, November 21, 2009
Where The Wild Things Are!
Danell, Patti and I made these for Max's 1st Birthday Party. Danell did an amazing job with his party. This cake is the one Max got to dive into. We copied it from online (can't remember the website) We made the horns and nose out of rice crispies instead of fondant (Danell's brilliant idea) and then covered them with frosting. I think the horns were a little big but hey he's a monster right? For the hair we put black and brown frosting into a piping bag, trying to keep them as separate as possible and then used the grass/hair tip (233.) This was a 6" spring form cake pan.
These cupcakes were so simple (I didn't have to do the printing and cutting out of all the cute pictures.) The cutouts are what made the cupcakes so cute. I love the one we used on the very top of the crown (sorry I cut it off in this picture, you can see it on the very last one.) She photoshopped Max's face on all of them. Miss Overachiever. I love it!
For this monster we used m&m's for eyes, cashews for nose and horns, and almond slices for the teeth. I used tip 12 to pipe on the swirl.
I told Danell I wanted to name my next boy Max just so I could do a party like this. It was so much fun! She had this outfit made for him, how cute is he?
Thursday, November 12, 2009
Super hero Cupcakes
Cassie and I made these for her son's 4th Birthday. They were so simple. I love how Cassie printed off the super hero logo's for the toppers. They give the cupcake so much personality and they were so easy. Love it!!
I am so sad, Cassie just moved and I will miss her so much. Thanks for the fun memories (especially those including sugar and crafts.)
Wednesday, October 28, 2009
Goulish Cupcakes!
Patti helped me make these for a Halloween party for our kids. I loved doing these and seeing them become little characters. We used the cream cheese frosting with vanilla and chocolate cake.
Cat-candy corn ears, M&M for eyes and nose.
Tombstone- Milano cookie, crushed oreo with gummy worm.
Mummy- M&M for eyes, lattice tip for bandage.
Werewolf hand- grass tip for grass, tootsie roll for arm, flattened green fruit slice cut in shape of hand with piped on fingernails.
Dracula- grass tip for hair, M&M for eyes.
Owl- grass tip(233) for hair, wintergreen lifesavers for eyes, cut candycorn for nose, pretzels for feet.
Spider- M&M for eyes, black licorice cut for legs.
EEK bat- Tip 16 for moon, icing decoration for bat.
Eyeball- gummy lifesaver for eyeball
Thanks Lisa for taking these pictures!
Monday, October 26, 2009
Halloween Brownie Pops
I made these brownie pops for my son's kindergarten Halloween party. They were so fun to make but took a while.
I used a box of brownies and baked them in the Wilton Brownie Pop Mold. I used the flour/pam spray to ensure that the brownies came out really well. I filled the mold all the way. They take 40 minutes to bake. Let them cool completely before removing them from the mold. I cut the uneven end off and then inserted the stick with a little melted chocolate on the end.
Mummy-covered twice with melted white chocolate. Once dried I drizzled white chocolate then added eyes.
Cat-covered in black frosting (regular buttercream tinted.) I added frosted candy corn for ears (before the body dries.) Then added face with melted white chocolate.
Pumpkin-covered in orange chocolate. I poked a hole in a green gumdrop and then slid it down the stick. I used the black frosting for the face. **it is much easier to use frosting for faces because the chocolate sets up so quick.
Spiderweb-covered in orange chocolate with the end rolled in black sprinkles. The web was added with black frosting.
Witches broom-I used a pretzel rod for the stick (I had to cut a hole in the brownie before pushing it through otherwise the brownie will fall apart). I used tip 16 to pipe on yellow broom and I used a orange slice that I cut into a ring for the ring.
Ghost-covered in white chocolate.
Dracula- covered with purple tinted frosting and accents piped on with chocolate.
These are what they looked like displayed.
Tuesday, October 20, 2009
200+ Caramel Apples!
Here we are yet again making more caramel apples and memories that I will never forget. Notice the smiles in this picture.=) The night is still young.
At this point it is midnight and we are finishing up our last batch (we did 5 total tonight) and we still have to cover some of them with chocolate. We didn't finish until 2:30 a.m. Wow! We have got to be crazy. This batch put us over 200 caramel apples this season. I just love this girl who is willing to be in the middle of all my craziness!
Tuesday, October 13, 2009
Boo!
Saturday, October 3, 2009
Soccer cupcakes!
It was my son's turn to bring the snack for the soccer game. And if you know me I was happy for the excuse to make cupcakes (I did also bring apples so I wouldn't feel so guilty about our kids over dosing on sugar.) I used a chocolate cake mix and the regular cream cheese frosting tinted green, black, and white.
To decorate these I put the green frosting in a piping bag with tip 233 (grass tip) and piped on the grass and topped them with the soccer icing decorations. It was so much fun making the grass and my son loved helping me place the soccer balls on top. I love how easy these were.
For these ones I put the black and white frostings in separate piping bags. Using tip 3 on the black bag I traced the outline of the black design and then filled it in with stars (tip 16.) I copied the design from a cupcake I saw on Whisk This.com. She did all the hard work coming up with the design. I then filled in the remaining areas with white stars. For added fun I dyed some coconut green to put under the cupcakes.
Wednesday, September 30, 2009
More Raspberry Bites!
I made these again for a baby shower and I just wanted to show how different they can look without the flag tray. For the recipe look under the 4th of July post. I am so thankful for my sister-in-law sharing this recipe. They are so delicious and I love how they are bite size. You can go back for seconds a few times and not feel guilty.
Wednesday, September 23, 2009
Caramel Apples
Patti and I are getting a head start on our fall treats. Isn't the fall such a fun time to make desserts? It puts me in the mood when the weather gets cooler, the leaves change colors, and whenever I see a pumpkin or an apple. We love making these yummy apples and will do them a few more times before the season is over.
I got my caramel recipe from Dena, my dear friend who is amazing at making candy. Since she sells these she has asked that I not share her recipe.
We use Granny Smith apples but our favorite is using the apples from our local orchard because the size is perfect, they are really tart, and of course they are fresh.
For the sticks we use the Skinny Sticks sold at Wal-Mart in the craft section. We spray the wax paper with Pam so the caramel won't stick as bad.
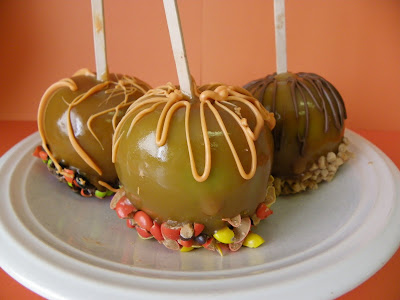
Before the caramel dried (which is pretty quickly) on these we dipped the bottom of the apple in either, crushed Reese's, M&M's, or Heath Bar. We have also dipped these in Milk Chocolate first before adding the additional topping. It is more beautiful that way but is also more expensive.
Once the caramel dried on these we dipped them in either melted milk chocolate and then crushed almonds or white chocolate and sprinkled with cinnamon and sugar on top. The latter is my favorite, Apple Pie Ale Mode is what it's called. We have discovered that after we dip the apple in milk chocolate let it set up a little before adding the toppings otherwise it will just drip down the apple because of the weight. If you have problems you can always set them in the freezer for a few minutes to set up quicker, but don't let them freeze.
Subscribe to:
Posts (Atom)